
In the last section, we reviewed how to use the style attribute to format text. But there is an even easier way to do limited formatting of text using good old fashioned html inline formatting tags. This way is definitely not recommended by the Web Gods. They hate this method because it does not result in “clean” code. So do not tell anyone I told you about this. But 20 years ago, this was how formatting was done. It is still legal. But just barely. This is why we are using HTML 4 Transitional pages instead of the more correct HTML 5 pages.
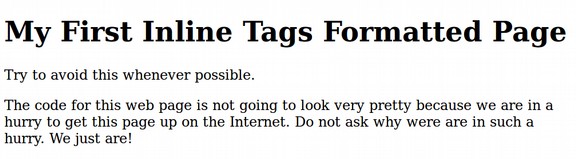
Open the Bluefish Editor and start a new page with the Quick Start icon. For Title, call it My First Inline Tags Formatted Page. Add the heading and starting paragraph sentence. Then save the file in your files folder as my_first_inline_tags_formatted_page.html.
Then enter a new line and type a couple of sentences. Put the entire paragraph in paragraph tags. Save the document and view in the browser:
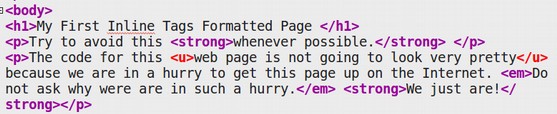
Now select the words “whenever possible” and in the Standard tab, click on the Bold button (with the big A). Select another sentence and click on the slanted A icon. Select a portion of a sentence and in the top menu, click Tags, Format by Layout, Underscore. Here is the HTML code showing that we have inserted a bunch of opening and closing tags:
Click File Save and view the page in a web browser.
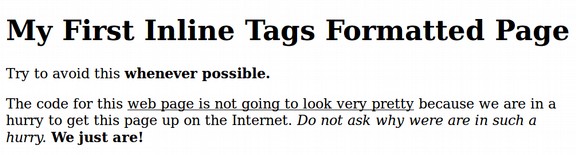
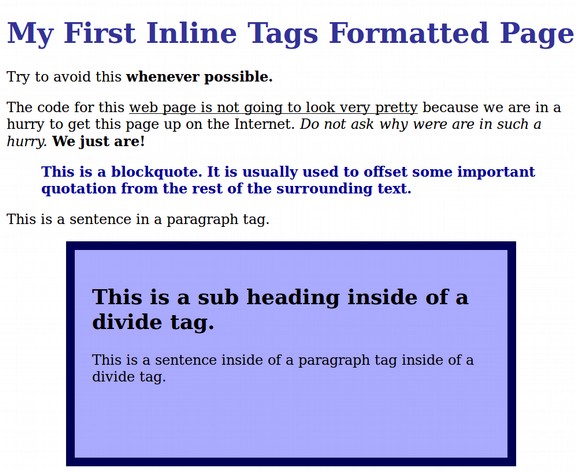
The page does not look that bad. But right click on the page and View Source to see this mess:
<body> <h1>My First Inline Tags Formatted Page </h1> <p>Try to avoid this <strong>whenever possible.</strong> </p> <p>The code for this <u>web page is not going to look very pretty</u> because we are in a hurry to get this page up on the Internet. <em>Do not ask why were are in such a hurry.</em> <strong>We just are!</strong></p></body>
It is OK to do some of this when you are in a hurry. But in the long run, it is better to go slower and do text formatting with CSS rather than putting in a bunch of confusing tags.
Inline Tags versus Block Elements
HTML elements can be divided into two categories : inline elements like the ones we just used and block elements which we will describe in more detail in a moment.
Here are some examples of inline elements:
<a> the link or anchor tag
<img> the image tag
<b> the bold text tag
<strong> another tag for bold text
<em> the italic text or emphasis tag
<u> the underline text tag
Here are some examples of block elements:
<h1>, <h2>, <h3> The heading and sub heading tags
<p> The paragraph tag
<ul> unordered list
<ol> ordered list
<table>
<blockquote>
<div>
Both inline and block elements appear in the body section of an HTML page (as opposed to the head section). But as we have just seen, inline elements generally do not begin on a new line. Also inline elements. Modify minor sections of a web page and occur inside of block elements. Block elements always begin on a new line and can control large areas of a web page. Block elements can also be nested in that they can contain other block elements and inline elements inside of them. We have already looked at most of the common block elements. Here we will look at two more: the blockquote element and the divide element.
Example of a Blockquote Element
In the Bluefish Editor, with our inline tag formatted page, enter a new line just above the closing tag. Then type in the <blockquote> opening tag. Then type:
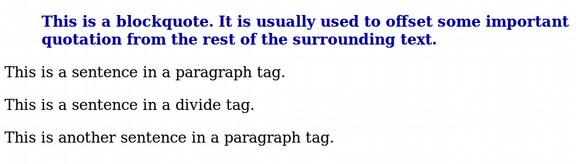
This is a blockquote. It is usually used to offset some important quotation from the rest of the surrounding text.
Then type in the blockqupte closing tag. To make the text stand out from the rest of the page, place your cursor inside of the block quote tag just before the ending bracket. Then increase the font size, darken the font weight and change the color to dark blue. Here is the HTML code:

Then save the document and view it with your browser:
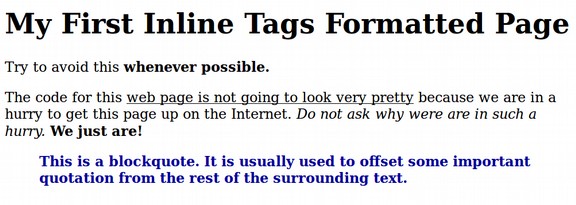
Note that the blockquote not only indents the text but it also provides some space above and below the text to offset it from the rest of the page. Best of all, the browser does this for us without the need to add any additional styling to the <blockquote> element.
Using Divide Tags
So far, we have broken the content up using heading tags and paragraph tags. But imagine you wanted to divide your web page up into various sections. Each section would have its own heading and paragraph tags and also its own background colors and other attributes. The Divide tag allows us to do this because the Divide tag creates a container or box that other elements like Headings and Paragraphs and Images go inside of. You can then style the divide tag and everything inside of the divide tag will be styled with it.
Example of a Simple Divide
In our Bluefish document, enter a new line below the block quote. Type in a sentence and put a paragraph tag around it.
Then type in a sentence and put a divide tag around it. The divide tag is located in Tags, MISC, Div. For now, we will skip putting the divide sentence in a paragraph tag.
Then type in a sentence below the divide and put a paragraph tag around it. Here is the HTML:

Save the document and then view it in a web browser.
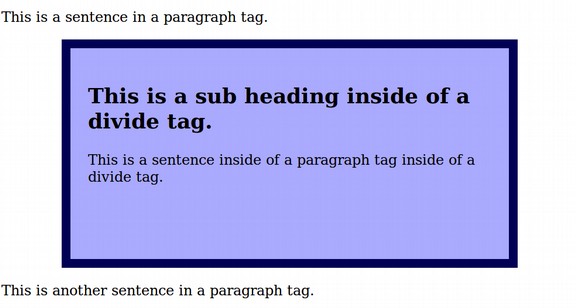
So far, there is no difference in the appearance of a divide tag and a paragraph tag. The web browser treats the two tags as if they are the same. Now let’s go back to Bluefish and add some style to the divide tag. We will also add a Sub Heading inside of the Divide element and put a paragraph tag around the sentence in the divide element. Here is what the HTML looks like:

Save the document and view with the browser.
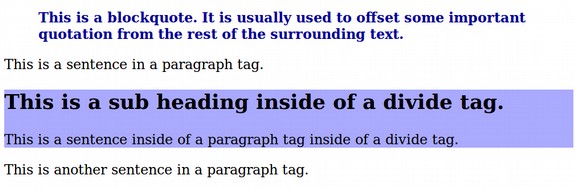
You can see that the divide element has formed a container, box or block in which we can style our heading and paragraphs.
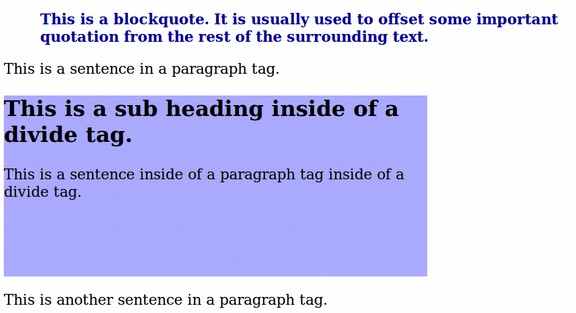
Set the Width and Height of a divide
Now that we have a block of content inside of a divide, with its own background color, we will next set the width and height for this divide. Just add this inside of our Style Attributes: height: 200px; width: 70%;. Save and view in your browser.
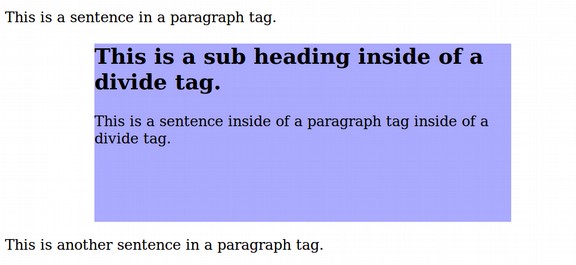
Center a Divide Container on a Web Page
You can center the divide box by setting the margins outside of the divide box to be equal. The way to do this is to add inside the divide style attribute: margin-left: auto; margin-right: auto;.
There is also a shorthand way to say the same thing. It is margin: 0 auto;.
Save the file and view in a browser.
Add padding or spacing inside of a Divide Container
The term padding is used to add spacing inside of a container or box. We can add 20 pixels of padding to just the top of the box with padding-top: 10px;. But we really want padding all around the edges of the box. This can be done with the shorthand: padding; 10px;.
Here is the HTML:

Save and view in a browser.
Add a Border Around the Divide Container
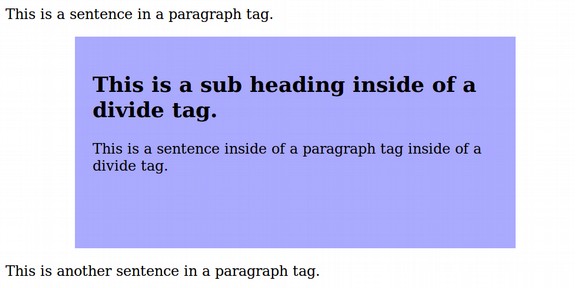
We can also add a colorful border around our divide container. Add to the style attributes: border-style: solid; border-width: 10px; border-color: #000055;
Here is the HTML of our divide:
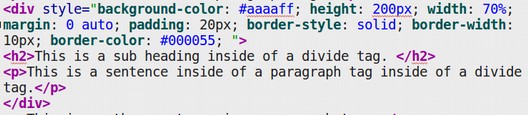
Then save and view the document in your browser.
The Box Model
Combining margins, borders, padding and content is often described as the box model.
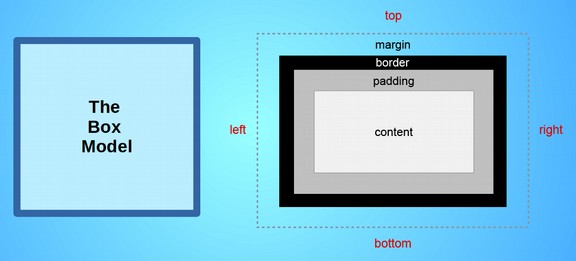
The CSS for the box model is to state the property dash position. For example, margin-top: 20px; border-left: 10px; padding-right: 15px;.
Placing the Divide CSS in the Head of our HTML document
Let’s take another look at the Style Attributes we have created for our Divide.

That is a lot of attributes and it clutters up the HTML in the body of our document. Ideally, the body of the document should only be used for content and structure. The appearance should be separated and placed in a style sheet inside the head of our document. This will allow us to change the content without changing the appearance – or change the appearance without changing the content. It would also allow us to have the same appearance on several pages without having to type in all of these style attributes every time we added a new page or a new divide. We will learn how to create a style sheet in a later chapter. But there is another way to move the style attributes from the body of our HTML document to the head of the document.
First, let’s copy all of our divide style attributes to our clip board:
style="background-color: #aaaaff; height: 200px; width: 70%; margin: 0 auto; padding: 20px; border-style: solid; border-width: 10px; border-color: #000055;
Second, while these attributes are selected, click Tags in the top menu. Then click MISC, then click the Style tag. This will change the style attribute inside of a style tag:
<style type="text/css"><!--
style="background-color: #aaaaff; height: 200px; width: 70%; margin: 0 auto; padding: 20px; border-style: solid; border-width: 10px; border-color: #000055;”
--></style>
Paste this style tag in the head of the document after the last meta tag. Then delete the style tag from the divide tag.
Clean up the style tag until it looks like this:
<style type="text/css">
div {background-color: #aaaaff; height: 200px; width: 70%; margin: 0 auto; padding: 20px; border-style: solid; border-width: 10px; border-color: #000055;}</style>
Save the file and view it in a browser. Hopefully, it will look exactly the same as it did when the style attributes were placed inside of the divide tag. You can also move any other style attributes to the style tag. Let’s make the heading of our document blue by adding: h1 {color: #333399;}. Here is the HTML
<style type="text/css">
div {background-color: #aaaaff; height: 200px; width: 70%; margin: 0 auto; padding: 20px; border-style: solid; border-width: 10px; border-color: #000055;}
h1 {color: #333399;}</style>
Save the file and view the page in your browser:
Add Comments to an HTML Document
You can add comments to your HTML document in a manner that can be viewed when looking at the course code but not viewed on the public facing web page. Enter a new line after the heading 1 closing tag and type: I was forced to use all of these extra formatting tags. Then select the sentence and in the top menu, click Tags. Comments. Save the file and view the web page with your browser. Then right click on the page and click View Source. Here is what the Comment looks like:

All you really need is: <! This is a comment.>
What’s Next?
Now that we have a better understanding of divide tags and the box model, in the next chapter, we will review Cascade Style Sheets (CSS) and selector options.
.