
I am not a fan of either ordered or unordered lists because they display unpredictably in different web browsers and when imported into CMS editors. I try to avoid lists whenever possible. However, since nearly all menus consist of lists, you should have at least a basic understanding of list tags. We will therefore begin with simple lists and then conclude with an example of a more complex list. We will describe the formatting of a list to turn it into a menu in a later chapter. The three tags we will review in this article are the unordered list tag, the ordered list tag and the list item tag.
- <ul></ul> The element represents an unordered list in HTML.
- <ol></ol> The element represents an ordered list in HTML.
- <li></li> The element represents a list item. List items are used inside of both unordered and ordered list.
Make a Simple Unordered List
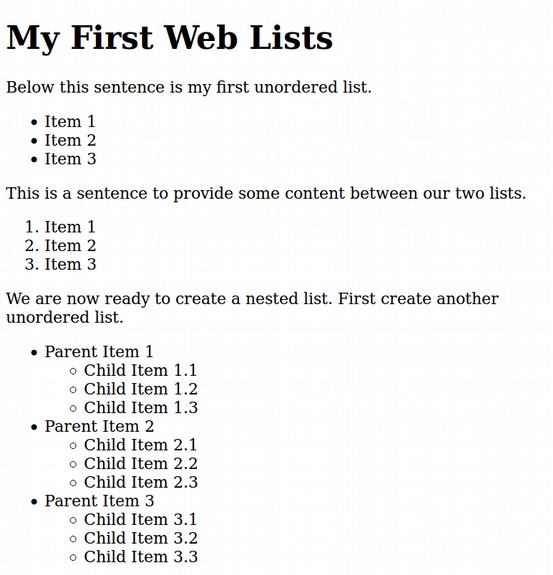
Unordered lists are often used to create menu horizontal and multi level menus. Open the Bluefish Editor and create a new HTML document called My First Web Lists. Below is the HTML lists document with a title and sentence.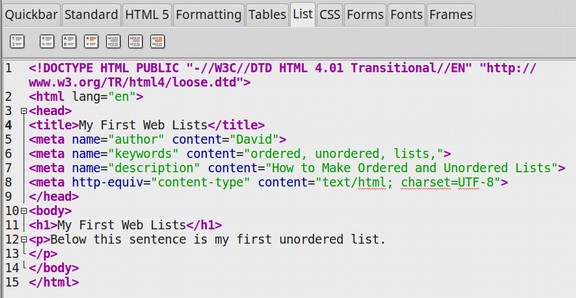
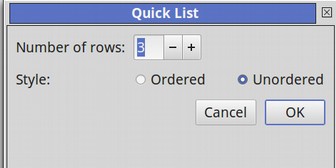
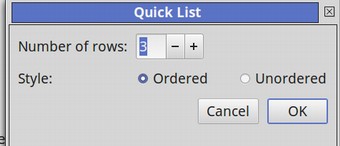
- It is open to the List tab which has 7 quick launch icons. Create a new line below the paragraph closing tag. Then click on the first icon which is the Quick List Wizard. Set it for three rows as an unordered list. Then click OK.
- Here is the Quick List Wizard.
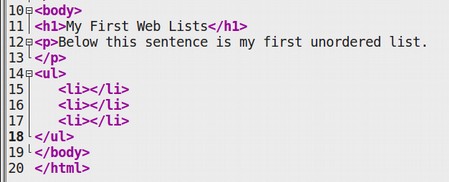
- Here is the resulting HTML code.
- Type in between the brackets, Item 1, Item 2 and Item 3. Then Save the document as myfirstweblist.html. Then open it with your browser.
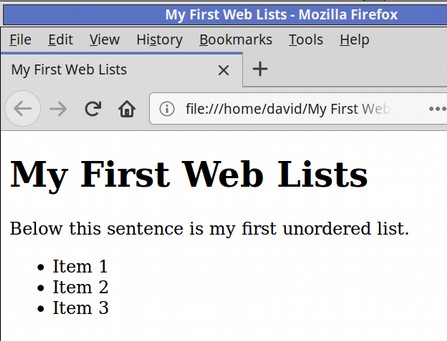
- Bullets are added automagically. Now let’s go back to our Bluefish Editor and type in a sentence with a paragraph tag below the first list. Then add another list below the new paragraph.
- This time we will make it an ordered list. Here is the wizard:
- Type in Item 1, Item 2 and Item 3 between the list item tags. Save the HTML file. Then view the result in your web browser.

The only real difference between an ordered list and an unordered list is that the ordered list uses numbers instead of bullets. The second and third icons merely insert an ordered or unordered list. We would need to add our own list item tags by clicking on the fourth icon.
The final three icons help create Definition Lists – a function that is rarely used. We will therefore skip Definition Lists and move on to Nested Lists.
Create a Basic Nested List
We will briefly introduce nested lists and then describe them in greater detail when we explain how to build menus. Nested lists are a way to create lists inside of lists. These are also called second and third sub level menus. A nested list should only be placed inside of a list item of a parent list. In other words, the nested list should be placed between the list opening and closing tags of the parent list.
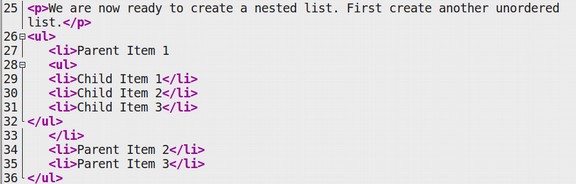
To make a nested list, click Enter to make a new line. Add a sentence to make a new paragraph. Then click Enter to make another new line. Click on the List Wizard to create a new Unordered List. Between the List Item brackets, type in Parent Item 1, Parent Item 2 and Parent Item 3. Here is what the HTML looks like:

Place your cursor right after Parent Item 1. Then click Enter twice to create a new line. Then use the List Wizard to add another unordered list. Between the list item brackets for the new list, type in Child Item 1.1, Child Item 1.2 and Child Item 1.3. Here is what the HTML looks like:
Repeat this process to create child menus after Parent Item 2 and Parent Item 3. Then click Save. Then view the page with your browser.
Here is what it should look like:
What’s Next?
This completes our introduction to HTML lists and list tags. In the next article, we will begin our review of HTML Attributes – which are ways of modifying and clarifying HTML tags.