
In this article, we will begin with a brief introduction to HTML structure and then use a text editor to create an HTML document. We will then use an amazingly simple and free tool called Bluefish to create a basic web page.
HTML Structure and the Bluefish Editor
HTML stands for the hypertext markup language. This language was developed by Tim Berners-Lee in 1991. It has been used as the primary language to create web pages ever since. There are now literally billions of web pages made using HTML. HTML uses markup opening and closing tags to let a browser know how to display what is inside of the tag. For example, the h tag is used to display a heading, the p tag is used to display a paragraph and the image tag is used to display an image.
Every page on the internet comes in two versions. There is the colorful page intended to be viewed by the public – and then the actual page rendered by the web browser.
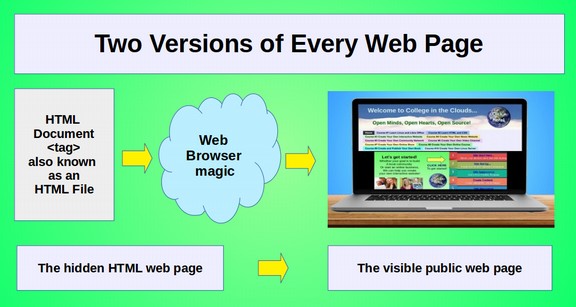
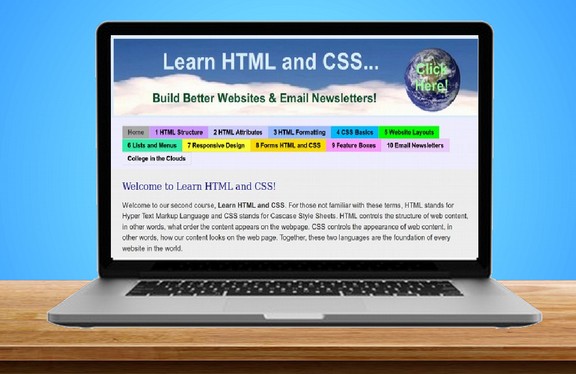
Right click on any web page, then click on View Page Source to see the real version of the web page which is its hidden or underlying HTML code . For example, here is the home page for Learn HTML and CSS:
Right click on the Home page of Learn HTML and CSS to bring up these options:
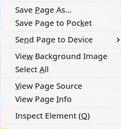
Then click View Page Source to see the following Source Code:
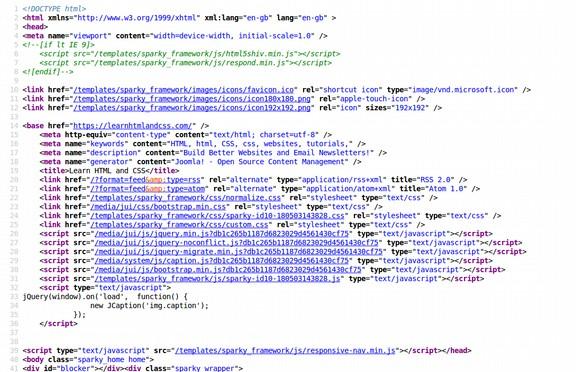
There are 40 lines of code before we get to the first image at the top of the page. I did not write any of this HTML code because I used a Content Management System (aka CMS) to build this website. So technically, you could use a CMS and never learn HTML or CSS. But even if you intend to use a Content Management System like we are using to build this website, knowing HTML can help you troubleshoot problems with your web pages and help you make customizations to your web pages. Imagine you come across a web page that has some cool feature and you wanted to know how that feature was created. For example, you see that we have a menu with 10 different colors and you want to have a similar colorful menu on your website. Right clicking on the page and then viewing the source can give you clues as to how it was done. But these clues will only make sense if you know how to read HTML and CSS.
Scroll down the source code until you get to the menu item “1 HTML Structure” and you will see the following code just before these words:
![]()
Translated to English, the above HTML code means that the browser should display a List Item using a class called “item-120” and another class called “medium purple.” The item or box if clicked on should link to or open a page called 1-html-structure” and the text in the box should be HTML Structure.
So the secret to having each menu item box be a different color is simply assigning each box to a different class. The Medium Purple class, in turn is defined in the custom CSS sheet listed in the head of the source code. Click on the Custom CSS sheet and then scroll down to the medium purple class.
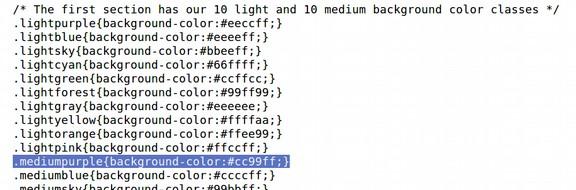
CSS classes have a dot in front of them. Medium Purple is one of ten classes I have created. It assigns a background color of #cc99ff which is a 6 digit code or hexadecimal code meaning some red (cc) and green (99) but a lot of blue (ff).
If you know HTML and CSS, you can do detailed analysis of any web page.
Now that we understand why it is so important to know HTML and CSS, let’s take a quick trip down memory lane. I have been building web pages for so long, I can remember a time before we had HTML and CSS. Those were the bad old days. Then in 1991, a smart fellow called Tim Berners Lee decided we needed some rules. He created HTML or the Hyper Text Markup Language. In the good old days, nearly every web page was created with a text editor just like we are going to do next.
Create Your Website Root Folder
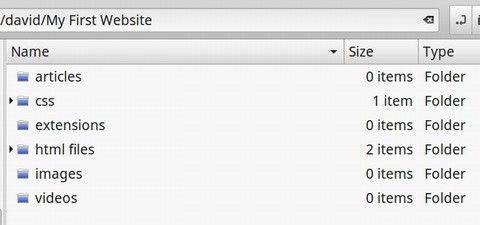
The first step in building any website is to create the website root folder. Open Your File Manager and create a folder called My First Website. Create folders in your Root folder for your website articles, css, extensions, html_files, images and videos. Your Root folder will look like the following.
Make an HTML Document with a Text Editor
You don't need a special tool for create an HTML document. We can write HTML with any basic text editor. There are many special web or coding editors such as Adobe Dreamweaver. In a moment, we will introduce a free open source web editor called Bluefish. But first, let’s create a test web page using a text editor. Open the Linux Mint Text Editor (or Notepad if on Windows or Text Edit if on a Mac).
Copy paste the following text:
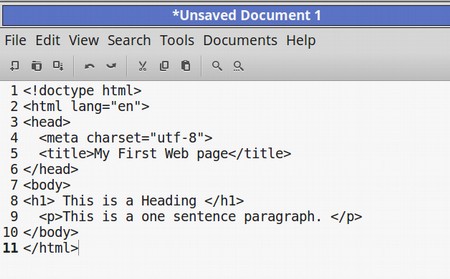
<!doctype html>
<html lang="en">
<head>
<meta charset="utf-8">
<title>My First Web page</title>
</head>
<body>
<h1> This is a Heading </h1>
<p>This is a one sentence paragraph. </p>
</body>
</html>
Here is what the code will look like in the Text Editor:

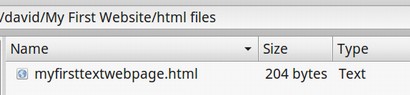
Save the file as a Text File in your HTML files folder in your website root folder. For the file name, use lower case letters with no spaces, such as “myfirsttextwebpage.” Here is what the Save As screen should look like:

Note that the Character Encoding should be set for UTF-8.
Then open your file manager, right click on the file and click on Rename. Then change the ending of the text file to (dot) html. Here is what our html document now looks like:
Right click on this file and open it with your Firefox Web Browser.
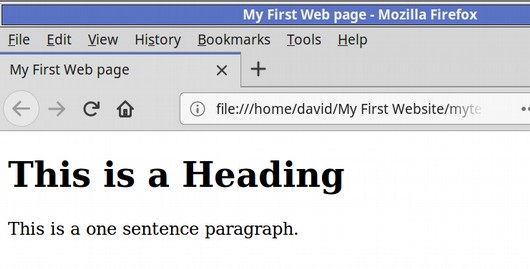
Congratulations! You have made your first web page! Now let’s take a quick look at the parts or components of an HTML document.
Structure of an HTML Document
An HTML document typically includes the following four parts:
DOCTYPE… Telling the browser this is an HTML document.
HTML ELEMENT Opening the HTML document
HEAD including the meta data of the HTML document.
BODY including the visible content of the HTML document.
Let’s take another look at our test document to see if we can spot these four parts of our HTML document.
DOCTYPE… Telling the browser this is an HTML document.
Line 1 is the only sentence with an opening tag <>but no closing tag.
HTML ELEMENT Opening the HTML document
Line 2 has an opening tag that also tells the browser what language to use. Whenever there is a statement such as lang equals followed by a property in parathesis it is called an attribute. This is the language attribute.
< html lang=”en”>
The closing tag for line 2 is on line 11.
HEAD element includes the meta data of the HTML document. Each HTML document aka HTML element can have only one HEAD element and one BODY element.
Line 3 is the opening tag for the head of the document. Line 4 is a meta data statement telling the browser to use the UTF 8 character set. This is the standard character encoding declaration: <meta charset=utf-8”>
However, there are several other ways to specify character encoding as we will see later when we create more documents.
Line 5 is the meta data title of the document that will appear in the top of the browser window. Meta key words and descriptions can also be added here as we will do later. Links to CSS Style sheets will also be placed in the head of the document as can links to Javascript files.
Line 6 is the closing tag for the head of the document.
BODY element includes the visible content of the HTML document. The body element is also called the Body tag.
Line 7 is the opening tag for the body of the document. Line 8 begins with a heading opening tag which is also called an element. This is followed by the heading of the visible part of the document. Then Line 8 ends with a heading closing tag. Each HTML document should only have one H1 element – but it can have as many sub-headings as you want. So no limit on H2, H3, etc.
Line 9 begins with a paragraph opening tag. This is followed by a one sentence paragraph. Then Line 9 ends with a paragraph closing tag. The paragraph tag is also called an Element. Line 10 is the body closing tag and Line 11 is the html document closing tag. There are also HTML elements for the following content items: Hyperlinks also just called links. Images. Videos. Tables. Forms. Sections. This are all discussed Sections 1.2, 1.3 and 1.4.
History of Web Editors
In the early days of the web, folks used a simple text editor to create web pages. Writing HTML with a text editor takes a lot of time because each opening and closing tag has to be typed in manually. In 1996, Microsoft came out with Frontpage which was a WYSIWYG editor making it easier and less error prone to creating web pages. Later, there was Dreamweaver which added a better file management system. In 2010, a wonderful free HTML editor called Kompozer was released. However, the project was abandoned. Currently, there is Wordpress, Joomla and others which include powerful editors which pretty much eliminate the need to write HTML code.
However, because we want to learn HTML, we will use a very nice, free, open source code editor called Bluefish. It will add the HTML tags for us and allow us to quickly view our progress while at the same time helping us to learn the code syntax without having to actually type in the opening and closing brackets. Bluefish will provide numerous clues as we make our document and even help us learn HTML and CSS as we create documents (which is the whole reason we are using it for this course).
Bluefish is a multi-platform code editor that runs on most desktop operating systems including Linux, FreeBSD, MacOS-X and Windows. Unlike Dreamweaver, you do not need a license to download and run Bluefish. In many ways, Bluefish is better than Dreamweaver because it has a much simpler interface. Bluefish is not merely a great HTML editor. It is also one of the best editors for creating CSS files, XML files and PHP files. If you have a Windows or Apple computer, you can download Bluefish from the Bluefish download page: http://bluefish.openoffice.nl/download.html
If you have a Linux Mint computer, just open up the Software Manager and type Bluefish into the Search Box. Then click on Bluefish and click INSTALL. Either way when you open up Bluefish you will see the following Editor screen.
Sections of the Bluefish Editor
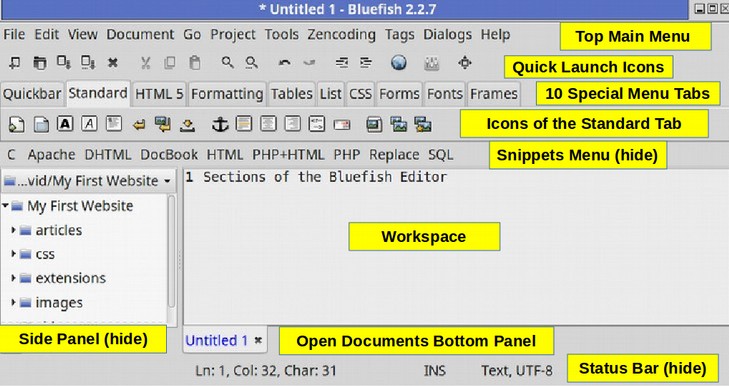
Initially, this interface might seem a bit complex – even intimidating with all of its options. But most of these options are rarely used.
Because we want to expand and focus on the workspace and use mainly the Tags Menu Item in the Top Menu, we will hide the Side Panel, Status Bar and Snippets menu. These can all be re-opened with a click of a button if and when we need them. This will create a much simpler interface.
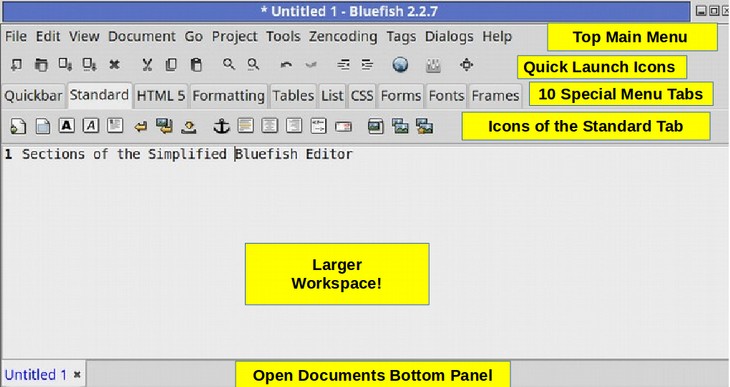
Sections of the Simplified Bluefish Editor
Click on the View Menu Item in the Top Main Menu, then uncheck the Side Panel, Status Bar and Snippets Menu. This is the Bluefish Editor after hiding the Side Panel, Status Bar and Snippets Menu.
Bluefish Top Main Menu
Let’s take a closer look at the 11 menu items in the Top Menu.

File includes, New, New from Template, Open, Open Recent, Save, Save As, Close and Quit (and many other options we will not use).
Edit includes Undo, Redo, Cut, Copy, Paste, Select All, Find and Replace and Preferences.
View allows us to hide some of the panels (as we have just done).
Document allows us to Wrap Text (check it) and increase the Font Size (do it).
Go allows us to switch between documents.
Project allows us to create a New Project (create a new folder) or open an existing project (open an existing folder). Unfortunately, Bluefish projects are not normal folders. So we will skip using this function and just use our file manager to create normal folders and files.
Tools allows us to open and view the HTML document with our Firefox Web Browser. You can also open Firefox with the round globe quick launcher. However, we need to save the document as an actual HTML file before we can open it and view it with Firefox.
Zen Coding allows us to quickly select a tag and all of the content inside of the tag.
Dialogs provides an alternate path to all kinds of functions.
Help has a link to the Bluefish Home Page.
Tags is the most important menu item. Click on it to bring up the following sub menu:
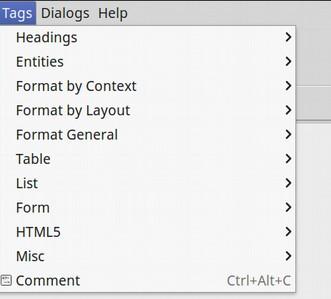
Select a line of text and then click on Tags, Headings to bring up the H1, H2, H3 through H6 tags. Click on the H1 tag and the line of text will have the H1 tags placed around it like the following:

The Format General item includes the Paragraph tag (which is the most common tag we will use). It also has Align Center tag which we will use to center our images and some of our headings.
Table, List and Form have tags associated with these functions.
MISC has the span, divide, link, style and image tags.
The Comments item will insert a comments section into the code allowing us to provide other coders with an explanation of what is happening in the code in a way where the comments will not be visible on the public web page.
What’s Next?
Now that we have a better understanding of the Bluefist Editor, in the next article we will review how to use the Bluefish Editor to apply the two most common HTML tags to a web page. These are Headings and Paragraphs.